Mastering Feed-In Braids: A Step-By-Step Guide
Contents
hide
What Are Feed-In Braids?
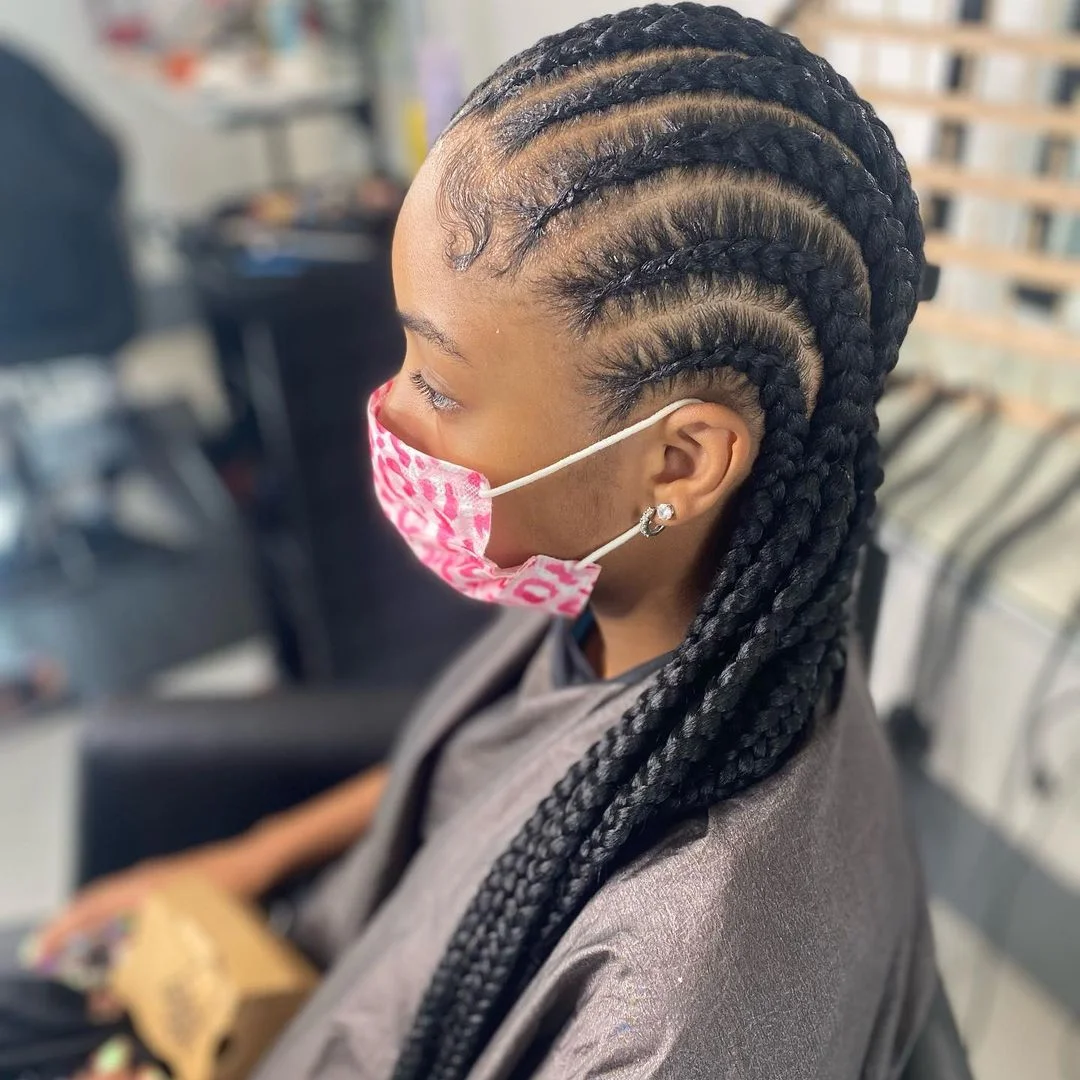
Feed-in braids, also known as invisible braids, offer a seamless blend with natural hair. They start thin at the roots, gradually increasing in size and incorporating added hair. This technique reduces the tightness and tension common with traditional braids. It also creates a more natural and extension-free appearance. Knowing how to do feed-in braids involves precise skill. The braids can range from simple, straight backs to intricate patterns and designs. This method enhances the versatility of braid styles. It’s suitable for all ages and occasions, making it a popular choice for many. Whether you’re aiming for a protective style or a trendy look, feed-in braids can be the perfect option.
Essential Tools and Products for Feed-In Braids
Before diving into learning how to do feed-in braids, you’ll need the right tools and products. Having the proper equipment ensures that the process goes smoothly and the end result looks professional. Here’s what you should have on hand:
- Rat-tail comb: This comb is essential for parting your hair neatly and creating precise sections.
- Hair clips or bands: Use these to separate and hold hair sections while you work.
- Braid hair extensions: Choose quality hair extensions that match your hair texture for a seamless blend.
- Edge control or gel: A good edge control or gel keeps flyaways in check and helps sleek down the hair at the roots.
- Hair moisturizer or leave-in conditioner: To keep your natural hair healthy, apply a moisturizer or conditioner before braiding.
- Scissors: For trimming the ends of hair extensions or removing excess hair.
Investing in high-quality products can make a significant difference in the ease of braiding and the longevity of your style. Ensure that the hair extensions are not too heavy, as this can lead to tension and stress on the scalp. By starting with the right tools and products, you’re setting yourself up for feed-in braiding success.

Preparing Your Hair for Braiding
Before you start creating feed-in braids, it’s crucial to prepare your hair properly. This preparation stage lays the groundwork for healthy, stunning braids. Follow these steps to get your hair ready:
- Cleanse your scalp: Begin with a clean slate by washing your scalp. Use a gentle shampoo to remove any buildup.
- Condition your hair: After shampooing, apply a hydrating conditioner. This step helps detangle your hair and adds moisture.
- Dry your hair completely: Ensure your hair is thoroughly dry before you start braiding. Damp hair can lead to frizz and slippage.
- Detangle from ends to roots: Use a wide-tooth comb to detangle your hair, starting at the ends and working up to the roots.
- Moisturize and protect: Apply a hair moisturizer or leave-in conditioner. This step nourishes your hair and protects it from breakage.
- Stretch your hair: If you have curly or kinky hair, stretch it out for easier braiding. You can twist, blow-dry, or band your hair.
Taking the time to prep your hair ensures that your feed-in braids are not only beautiful but also protect the health of your hair. How you do feed-in braids starts with a strong foundation, so don’t skip this essential step.
Step-by-Step Instructions for Creating Feed-In Braids
Now that you’ve gathered your tools and prepped your hair, it’s time to start the braiding process! Feed-in braids require a certain level of expertise, but with this step-by-step guide, you’ll be well on your way to mastering the technique. Here’s how to do feed-in braids:
- Start with clean parts: Using your rat-tail comb, create a straight part where you want your braid to begin. Clean parts are crucial for a polished look.
- Begin braiding: Take a small section of hair at the top of your first part and divide it into three equal strands. Start a regular three-strand braid, crossing the right strand over the middle and then the left strand over the middle.
- Feed in the extensions: Once you’ve braided a few crosses, it’s time to add in your first extension. Fold a small piece of braid hair to create a thin strand and add it to the middle strand before the next cross. Each time you cross the hair over, add in more hair, gradually increasing the size of the braid.
- Secure the braid: Continue braiding down the length of your hair, feeding in extensions as needed. Once you reach the end, secure the braid with a hair band or thread.
- Repeat: Repeat these steps for each braid until your desired style is achieved. Remember to maintain even tension throughout for comfort and consistency.
- Finish with edge control: Apply edge control or gel to tidy up any loose hairs around the hairline, and to keep the braids neat longer.
By breaking down the braiding process into manageable steps and taking your time, creating feed-in braids becomes a much smoother experience. Patience and practice are key, so don’t get discouraged if your first few attempts aren’t perfect. With practice, you’ll be able to do feed-in braids with confidence and ease.

Tips for Maintaining Feed-In Braids
Maintaining your feed-in braids is crucial for keeping them looking sleek and fresh. Here are some tips to help you preserve your braid’s beauty:
- Keep your scalp moisturized: Regularly apply oil to your scalp to prevent dryness.
- Avoid excessive manipulation: Touching your braids too often can cause frizz and loosen them.
- Wrap your hair at night: Use a satin scarf or bonnet to reduce friction and frizz as you sleep.
- Wash your braids carefully: If needed, gently cleanse your scalp and braids with a diluted shampoo.
- Dry braids thoroughly: After washing, ensure your braids are completely dry to prevent mildew and odor.
- Refresh the style: Apply edge control or gel to maintain smooth edges and keep your style neat.
- Protect from the elements: Wear a hat or use an umbrella when out in harsh weather, like rain or strong sun.
By following these tips, you can extend the life of your feed-in braids and keep your hair looking great. Remember that less is often more when it comes to braid maintenance. Gentle care will go a long way in preserving your braids.
Common Mistakes to Avoid With Feed-In Braids
Feed-in braids are a gorgeous and versatile style, but common mistakes can affect their look and health of your hair. Avoid these pitfalls to ensure your braids remain flawless:
- Too tight braids: Starting your braids too tightly can cause tension and damage to your scalp. Ensure you’re braiding firmly but not pulling excessively.
- Inconsistent section sizes: For a uniform look, keep your sections even. Varying sizes lead to an irregular appearance and can affect the braid’s tension balance.
- Overuse of products: Applying too much gel or moisturizer can build up on your scalp and weigh down your braids. Use products sparingly for best results.
- Neglecting your natural hair: Your natural hair needs care, too. Skipping moisture or protective products can lead to breakage and damage.
- Poor quality extensions: Opt for high-quality braid hair that matches your texture. Cheap extensions can look unnatural and may not last as long.
- Rushing the process: Feed-in braiding takes time and patience. Rushing can result in uneven braids and a less polished outcome.
By avoiding these mistakes and following the guidelines provided in the previous sections, you can create and maintain beautiful feed-in braids that look professional and last longer.
Styling Ideas for Feed-In Braids
Versatility is one of the biggest advantages of feed-in braids. Once you have mastered how to do feed-in braids, you can explore a variety of styling ideas that suit any occasion. Whether you’re looking for a casual look for everyday wear or a more elaborate style for a special event, here are some inspiring ideas:
- Classic straight-back braids: Keep it simple and chic with straight-back braids. They are perfect for both casual and formal settings.
- Braided updo: Elevate your braids into an elegant updo. This style is ideal for weddings or formal gatherings.
- Half-up, half-down style: Combine the ease of having your hair down with the neatness of an updo. It’s a playful look for any day.
- Ponytail with feed-in braids: Draw your braids back into a sleek ponytail. It’s a powerful look that commands attention.
- Braided bun: Twist your braids into a bun at the back or top of your head. It’s a tidy style that keeps hair out of your face.
- Side-swept braids: Sweep your braids to one side for a flirty and asymmetrical look. This works well for casual outings.
- Braids with beads or accessories: Add beads, rings, or wraps for a personalized touch. These embellishments can give your braids an extra pop.
- Layered braids: Create depth by having braids of different lengths. It adds a contemporary flair to the traditional style.
Every style mentioned can maintain the health of your hair while offering a new and exciting look. Experiment with these styles to keep your feed-in braids feeling fresh and fashionable. Remember to protect your braids and prevent frizz while styling. With these ideas, you’re equipped to turn heads with your feed-in braids.

Removing Feed-In Braids Safely
Removing feed-in braids without causing damage to your natural hair is important. Here are steps to help you take out your braids safely and gently:
- Apply oil to your braids: Start by applying a gentle oil to your braids. This helps to loosen them.
- Unravel the ends first: Start at the ends of your braids and slowly unravel them upwards.
- Use a comb for assistance: A wide-tooth comb can help remove any knots as you go.
- Snip extensions with care: If you tied the braids with thread, cut the thread carefully. Avoid cutting your own hair.
- Avoid pulling or tugging: Gently undo the braids without yanking. Pulling can cause breakage.
- Detangle Afterward: Once all braids are out, gently detangle your hair starting from the tips.
- Wash and condition your hair: After detangling, wash your hair with a gentle shampoo. Follow with a conditioner to restore moisture.
By taking your time and using the right technique, you can ensure that removing your feed-in braids is a smooth, damage-free process. Remember to be patient and treat your hair with care throughout the removal process.