Get Creative with Halloween French Tip Nails: Easy DIY Designs
Introduction
Halloween is a time for creativity, fun, and a bit of spookiness! One way to express your festive spirit is through your nails. Halloween French tip nails are a trendy option that combines the classic elegance of French tips with a touch of seasonal flair. Whether you’re attending a Halloween party, trick-or-treating, or just showing off your style, Halloween-themed nails can be a great conversation starter. This article will delve into easy DIY designs for Halloween French tip nails and guide you on how to create stunning looks that capture the spirit of the season.
Why Choose Halloween French Tip Nails?
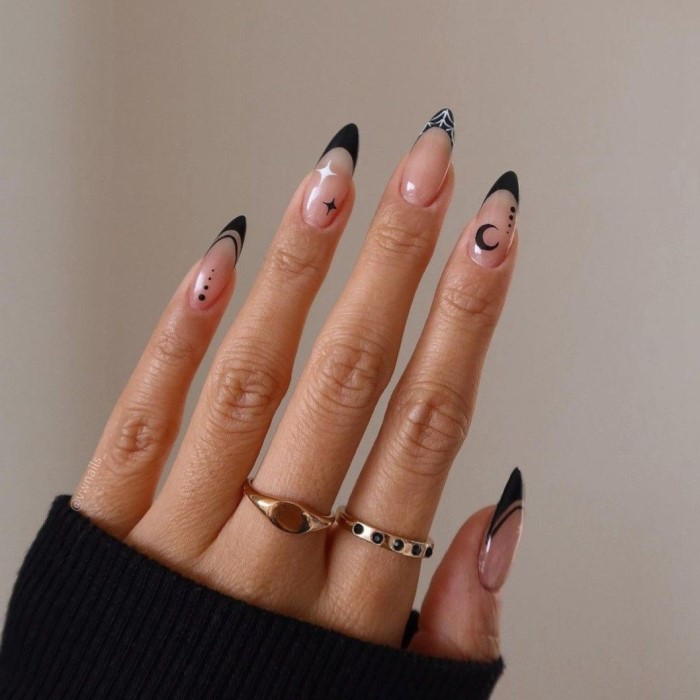
French tip nails are traditionally known for their simplicity and sophistication. However, by incorporating Halloween themes, they become striking and unique. This design approach allows you to enjoy the classic French tip style while embracing creative elements. You can use Halloween colors like orange, black, or purple, along with fun patterns like pumpkins, ghosts, or cobwebs.
Many people worry that elaborate nail designs might not look good on them. This is where Halloween French tip nails shine. They are versatile and can be personalized according to your taste. Plus, they won’t break the bank or require you to book a salon appointment. You can easily achieve these looks from the comfort of your home.
Easy DIY Designs
Creating Halloween French tip nails is easier than you might think. Here are some simple designs that you can try out:
Classic Orange and Black French Tips
One of the simplest designs is the classic orange and black French tip combination. Start with a neutral base coat on your nails. Once it’s dried, apply a thin orange line at the tips of your nails. For extra dramatic flair, you can add a small black line just above the orange tips. This design balances Halloween colors beautifully while maintaining the elegance of French tips.

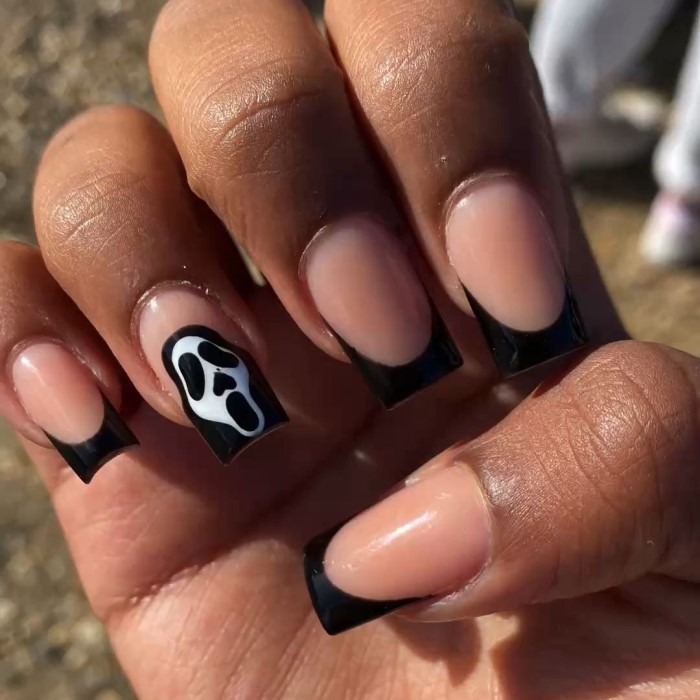
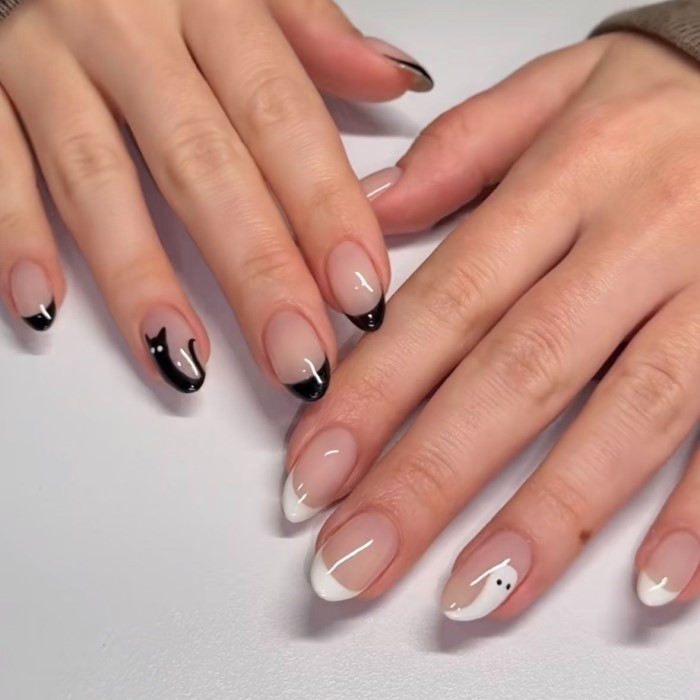
Ghostly White French Tips
To create a ghostly effect, you can use white polish for the tips and add little ghost faces on your neutral base. Use a dotting tool or a small brush to paint the eyes and mouth of the ghost. This cute design is perfect for those who want something more playful.
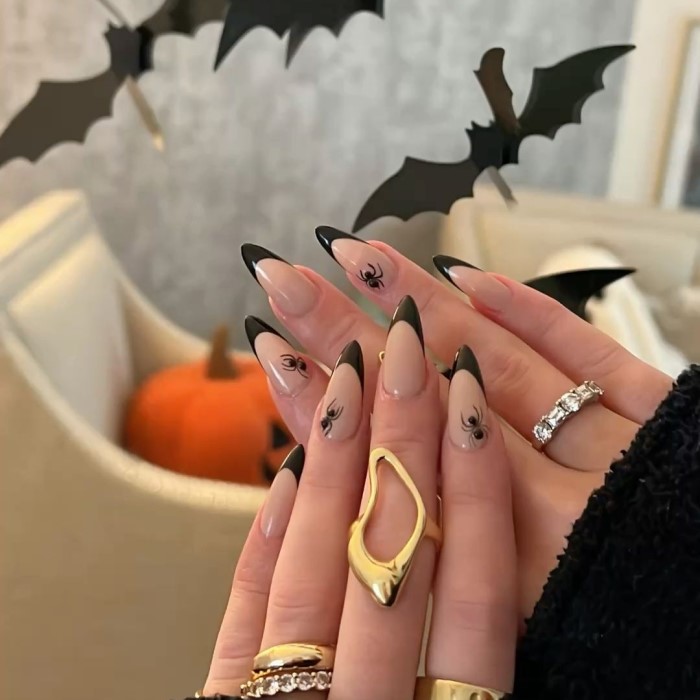
Spider Web French Tips
If you’re looking for something a bit more intricate, consider the spider web design. Begin with a dark base coat. Once it’s dry, use a thin brush or a nail art pen to create webs at the tips. You could even add a tiny spider for an extra touch. This design is a fun way to add some creepiness to your nails while keeping a classic vibe.
Preparing to Create Your Halloween French Tip Nails
Before diving into your manicure, it’s essential to gather the necessary tools and materials. Start by ensuring you have the following:
Nail Polish
- Selecting Your Base Color: The base color serves as the foundation for your nail design and sets the overall tone. When preparing for a Halloween-inspired manicure, opt for colors that evoke the spirit of the holiday. Classic shades such as deep orange, eerie green, spooky black, or vibrant purple can create a festive atmosphere.
- Choosing Colors for Nail Tips: For added flair, consider applying a different color to the tips of your nails. This technique, often referred to as a French manicure or a tip design, can be customized with Halloween colors. Metallic shades like gold or silver, as well as glittery options in orange or black, can perfectly complement the base color while enhancing the Halloween theme.
- Incorporating Halloween Themes: Beyond just colors, think about incorporating Halloween-themed designs into your polish selection. For instance, using nail polishes with special effects—like glow-in-the-dark or glittery finishes—can make your nails stand out even more during Halloween festivities.
Nail Tools
- Essential Nail Tools: Having the right tools is crucial for achieving a polished and professional-looking manicure. Start with a high-quality nail file to shape and smooth the edges of your nails. An ergonomic design will enhance comfort while filing.
- Cuticle Pusher: A cuticle pusher is essential for preparing your nails. Gently push back the cuticles to create a clean canvas for polishing. This step not only enhances the appearance of your nails but also helps the polish adhere better by providing a neat surface.
- Small Brush for Art Designs: A small detailing brush is perfect for creating intricate nail art designs. With this tool, you can easily apply additional colors or patterns to achieve special effects, such as spider webs, pumpkins, or ghost faces. Using a fine brush allows for precision, elevating your nail art to the next level.
- Optional Tools: Consider adding other optional tools to your kit, such as nail stickers or stencils, for those who may prefer an easier approach to nail art. Dotting tools can add additional design elements like polka dots or small shapes, enhancing the overall look of your Halloween manicure.
Top Coat
- Purpose of a Top Coat: A top coat is an essential final step in your nail art process, serving multiple purposes. The primary function of a top coat is to seal in your base and tip colors, creating a smooth finish that helps prevent chipping.
- Achieving a Glossy Finish: One of the most notable benefits of applying a top coat is the glossy finish it provides. This shine enhances the overall appearance of your manicure, making it look fresh and vibrant. For a unique take, you can also experiment with matte top coats for a different effect that contrasts the typical glossy shine.
- Extending the Life of Your Nails: A high-quality top coat not only makes your nails look great, but it also helps protect your design from everyday wear and tear. By acting as a barrier against environmental factors, such as water and dirt, a top coat significantly extends the longevity of your manicure, allowing you to enjoy your Halloween-themed nails for longer.
- Reapplication: To maintain the shine and protective qualities of your manicure, consider reapplying the top coat every few days. This practice will keep your nails looking fresh and vibrant throughout the Halloween season and beyond.
- Dry Time and Quick-Dry Options: When selecting a top coat, keep in mind that some products may require longer drying times. However, there are quick-dry formulas available that allow you to keep moving without waiting too long for your nails to dry. This option is particularly helpful during busy Halloween preparations!
Once you have your materials, take time to prep your nails. Remove any old polish, push back your cuticles gently, and file your nails to your desired shape. The key to a beautiful manicure starts with clean, well-tended nails.
Step-by-Step Guide
Using the right technique can make all the difference in achieving professional-looking results. Here’s a step-by-step guide to help you through the process:
- Apply your base coat: This step is critical as it not only protects your nails but also helps the polish adhere better.
- Paint your base color: Choose a neutral shade or a color of your choice, and apply two coats for full coverage.
- Create the French tips: Dip a thin brush or nail art pen into your chosen color for tips. Start at one side of the nail and gently sweep towards the center, then back to the side, creating a “U” shape.
- Add decorations: If you aim for additional designs, let the tips dry, and then carefully add your Halloween art—like ghosts or spider webs.
- Finish with a top coat: Seal in your designs with a top coat for added shine and protection. This will also help your manicure last longer.
Trends in Halloween Nail Designs for 2025
Nail art continues to evolve, and Halloween is no exception. In 2025, there is a rising trend toward minimalist designs that maintain a seasonal flair. Over the years, we have seen bold, elaborate nail art dominate Halloween, but simplicity merged with elegance now takes the forefront.
Some of the top trends for Halloween nails this year include:
- Subtle shimmer: Incorporating metallic or glitter accents in Halloween colors can enhance your classic French tips.
- Matte finishes: Matte nails with glossy tips create striking contrasts that look chic and stylish.
- Negative space designs: These designs allow part of your natural nail to show through, making creativity limitless.
Frequently Asked Questions
What is the meaning behind French tip nails?
French tip nails originated in the 1970s, aimed to offer a natural and elegant nail appearance. They symbolize simplicity and style. Women commonly chose this design to achieve a polished look without the need for bold colors, making them timeless.
What color nails should I get for Halloween?
When selecting colors for Halloween nails, traditional choices include black, orange, purple, and green. However, you can also experiment with unique colors that fit your style, like metallics or pastels.
Are French tips in style 2025?
Absolutely! French tips have made a remarkable comeback. In 2025, expect to see various updates to this classic design, such as trendy colors, textures, and innovative artistic elements that keep them fresh and appealing.
Do men find French nails attractive?
It often depends on personal taste; however, French tip nails are generally considered elegant and classic, attributes that many find appealing. The simple sophistication of these nails tends to resonate positively across various preferences.
Conclusion: Embrace Your Halloween Spirit with Nail Art
Halloween French tip nails offer a perfect blend of creativity, tradition, and seasonal fun. They are an invitation to express your individuality while celebrating this spirited holiday. With the easy DIY designs and tips shared in this article, you can confidently adorn your nails in festive styles that capture the essence of Halloween.
Whether you prefer a playful ghost design or classy pumpkin tips, Halloween French tip nails can make your celebration even more memorable. Remember that practice makes perfect, so don’t hesitate to experiment with shapes and colors. Be sure to embrace your creativity, enjoy the process, and make your nails a conversation starter for all your Halloween festivities!

