How to Test Gold Jewelry – 7 Reliable Methods That Work
Why Knowing How to Test Gold Jewelry Matters
Understanding how to test gold jewelry is essential for buyers, sellers, and collectors. Fake or mislabeled pieces are common. Some items look real but contain little or no gold. Others have thin plating over base metal. Without testing, you risk wasting money.
Many people inherit jewelry or buy secondhand. They assume it’s genuine. However, not all family heirlooms are solid gold. Some are costume pieces. Learning how to test gold jewelry helps confirm value. It protects your investment.
Sellers also benefit. Accurate testing builds trust. You can list items with confidence. Buyers feel secure when they see proof. This increases sales chances. Honesty leads to better transactions.
Additionally, gold prices rise and fall. Knowing the true content lets you track worth. Whether selling now or later, accurate knowledge gives power. Mastering how to test gold jewelry puts you in control.
 Visual Inspection: The First Step in Testing
Looking for Hallmarks and Stamps
The first step in how to test gold jewelry is checking for stamps. Most real gold items have small engravings. These indicate purity. Common marks include 10K, 14K, 18K, or 24K.
Use a magnifying glass. Look on clasps, inside rings, or earring backs. These spots hide tiny imprints. A “585” stamp means 14K gold. “750” stands for 18K. “999” is pure gold.
Not all real pieces have stamps. Older or handmade jewelry may lack them. But missing marks raise suspicion. Never rely only on engraving. Combine it with other tests.
Counterfeiters sometimes fake hallmarks. They stamp base metals to trick buyers. Always verify with additional methods. Relying solely on markings is risky. True how to test gold jewelry includes multiple checks.
Checking Color and Surface Wear
Gold has a rich yellow tone. Lower karats mix with other metals. This changes the shade. 10K appears paler than 18K. Rose gold contains copper. White gold uses nickel or palladium.
Look at high-wear areas. Check edges of rings or necklace chains. If gold wears off to reveal a different color underneath, it may be plated. Real gold keeps its hue throughout.
Plated jewelry often shows silver or gray where scratched. Solid gold does not flake. Use a pin gently if needed. Only do this in hidden spots. Avoid damaging valuable pieces.
Discoloration matters too. Tarnish suggests non-gold metals. Pure gold does not tarnish. If a piece turns black or green, it likely contains base alloys. This signals caution during how to test gold jewelry.
 Magnet Test: A Quick and Easy Method
Using Magnets to Detect Non-Gold Metals
A simple way to start how to test gold jewelry is the magnet test. Real gold is not magnetic. It will not stick to a strong magnet. Iron, nickel, and steel do attract magnets.
Hold a neodymium magnet near the item. Move slowly. Watch for any pull. If the jewelry jumps toward the magnet, it’s not pure gold. Even slight attraction means mixed metals.
This test works best for large pieces. Chains, bracelets, and pendants show clear results. Small studs or thin bands may give weak reactions. Still, no attraction supports authenticity.
However, some base metals aren’t magnetic either. Aluminum and copper pass this test. So a non-magnetic result doesn’t prove gold. It only rules out certain fakes. Always follow up with more checks when learning how to test gold jewelry.
Limitations of the Magnet Test
While useful, the magnet test has limits. Not all fake gold contains magnetic materials. Some use brass, copper, or zinc. These won’t react to magnets. That means a false sense of security.
Also, white gold may include nickel. Nickel is slightly magnetic. A very weak pull might occur. This could confuse beginners. Don’t assume a piece is fake based on slight movement.
Magnet strength matters. Weak fridge magnets may miss subtle pulls. Use a strong rare-earth magnet. Test from different angles.
Remember, this method only identifies obvious fakes. It cannot confirm real gold. It should be one step in a full routine. As part of how to test gold jewelry, it’s fast but incomplete.
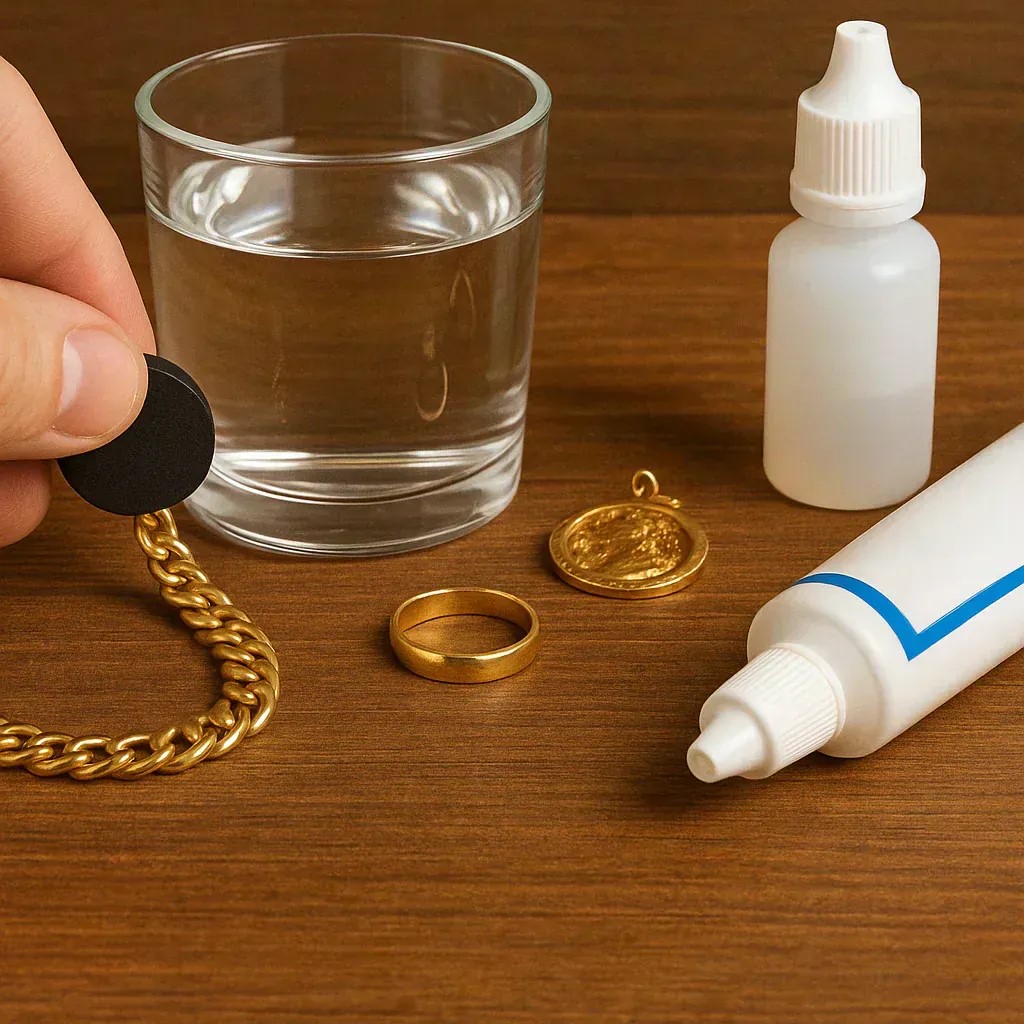
Acid Test: One of the Most Reliable Methods
Applying Nitric Acid Safely
The acid test is a trusted way to learn how to test gold jewelry. It uses nitric or aqua regia solutions. These react differently with various metals. Gold resists corrosion. Other metals dissolve or change color.
Buy a gold testing kit. It includes bottles of acid and a touchstone. Rub the jewelry on the stone to leave a streak. Drop acid on the mark. Watch the reaction.
If the line fades or bubbles, it’s not gold. A steady yellow streak means real gold. Compare results with the kit’s guide. Each acid matches a karat level.
Always wear gloves and work in a ventilated area. Acids are strong chemicals. Keep away from skin and eyes. Do not use on gemstones. The acid can damage them. Test only on plain metal parts.
Interpreting Results by Karat Level
Different acids test for different purities. One bottle checks 10K. Another confirms 14K or 18K. Follow the instructions carefully. Use the correct solution.
A positive result means the item matches the expected grade. For example, if you test a 14K ring and the acid shows no reaction, it passes. If it fizzes or disappears, it fails.
False positives happen with thick plating. High-quality plating may resist acid briefly. But deeper scratches expose the base metal. Always scratch in a discreet spot.
When done right, the acid test gives clear answers. It’s used by jewelers worldwide. As part of how to test gold jewelry, it offers strong evidence.
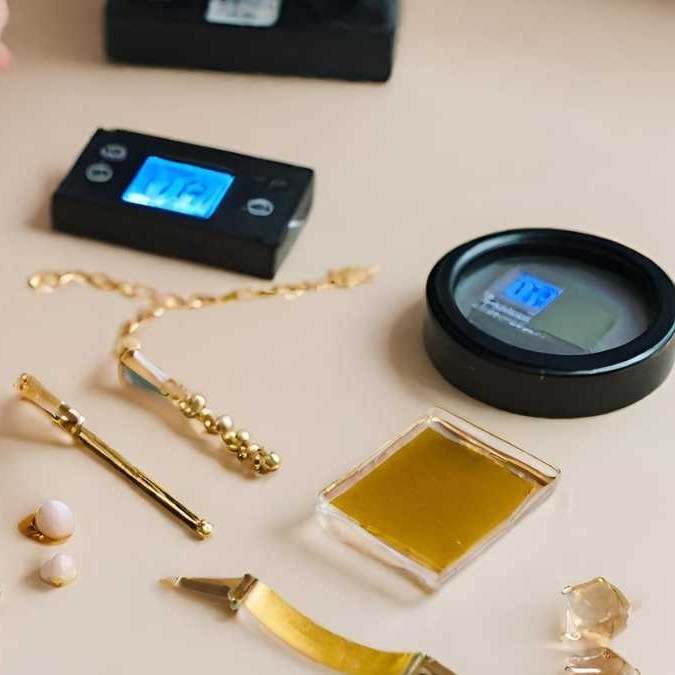
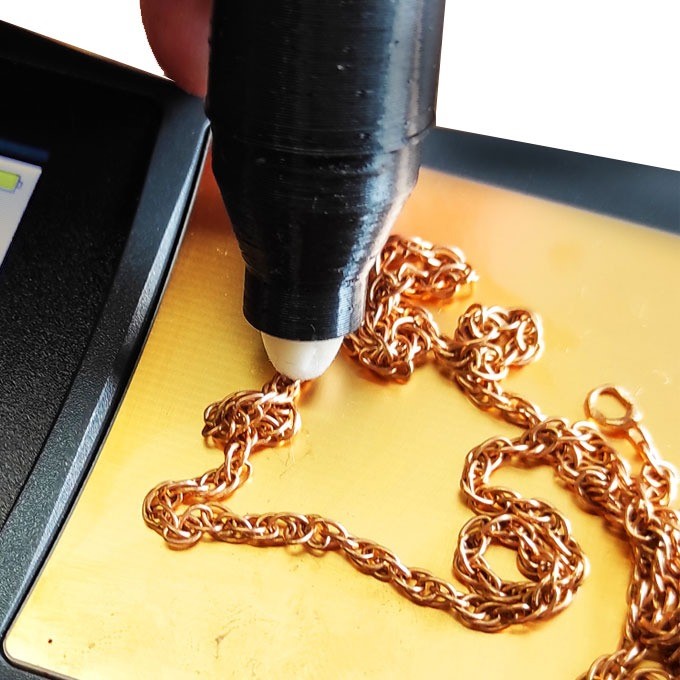
 Electronic Gold Tester: Fast and Non-Destructive
How Digital Testers Work
An electronic gold tester is a modern tool for how to test gold jewelry. It sends a small electric current into the metal. Then measures conductivity. Gold has a unique response.
Turn on the device. Place the probe on clean metal. Hold for a few seconds. The screen displays karat value. No damage occurs. The process is quick and safe.
These testers work on rings, necklaces, and earrings. They handle all colors—yellow, white, rose. Some models detect plating. They alert you if the surface differs from the core.
Calibrate before each use. Clean the probe tip. Dirt affects accuracy. Use with fresh batteries. Weak power causes errors. A well-maintained tester gives reliable results.
Accuracy and Maintenance Tips
Electronic testers are accurate when used correctly. Dirty surfaces cause mistakes. Wipe the jewelry with alcohol first. Remove lotions, oils, or dirt.
Test multiple spots. Plated items may read as gold on the surface. But inner layers differ. A low reading under a scratch reveals the truth.
Keep the device dry. Moisture harms electronics. Store in a case. Replace worn probes. Old tips reduce sensitivity. Regular care ensures long life.
This tool suits frequent users. Pawn shops, jewelers, and dealers use them daily. For personal use, they pay off over time. As part of how to test gold jewelry, they offer speed and safety.
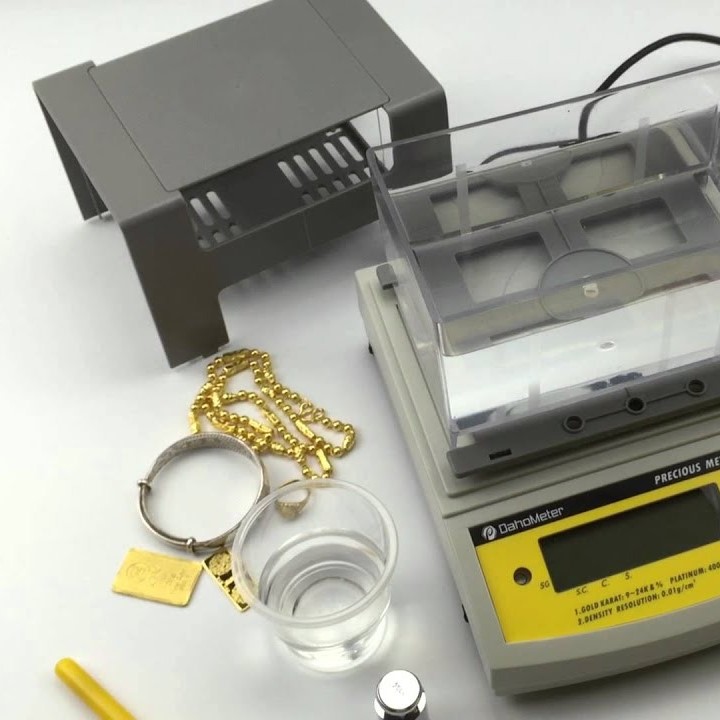
Water Displacement and Weight Test
Measuring Density with the Archimedes Method
Another way to how to test gold jewelry is through density. Gold is heavy for its size. This method compares weight to volume. It’s called water displacement.
Weigh the item on a digital scale. Record the grams. Fill a graduated cylinder with water. Note the level. Lower the jewelry in. Watch how much the water rises.
Each milliliter equals one cubic centimeter. Divide weight by volume. The result is density. Pure gold has a density of about 19.3 g/cm³. Lower numbers mean mixed metals.
For example, brass is around 8.5. Silver is 10.5. If your result is far below 19, it’s not solid gold. This test works well for solid pieces. Hollow items may give false readings.
It takes practice. Make sure no air bubbles stick to the piece. Dry it fully before weighing. Be patient. Precision improves with repetition. This scientific approach strengthens how to test gold jewelry.
When This Test Is Most Useful
The water test works best for solid bars, coins, or thick pendants. Items without stones or hollow centers give clear results. Rings with wide bands are good candidates.
Avoid using it on porous metals or plated items. Water may seep in. This affects weight. Also, never test jewelry with glued-in gems. Water can loosen adhesives.
It’s great for comparing known samples. If you own real gold, use it as a baseline. Match new items against it. Similar density suggests authenticity.
This method adds depth to how to test gold jewelry. It’s non-chemical and repeatable. With careful steps, it becomes a trusted tool.
 Frequently Asked Questions
Can I Test Gold Jewelry Without Damaging It?
Yes, several methods are non-destructive. The magnet test leaves no marks. Electronic testers do not harm the surface. Water displacement is safe too.
Visual checks and hallmark reviews are harmless. Use a loupe to inspect. Never scratch unless necessary. Always avoid visible areas.
Acid testing requires a small scratch. It damages the piece slightly. Only use it when other tests fail. Or when you accept minor blemishes.
For sentimental items, skip destructive tests. Take them to a pro instead. Preserving condition matters most. There are many ways to how to test gold jewelry safely.
What Should I Do If My Jewelry Fails the Test?
Stay calm. Failing doesn’t always mean fraud. The piece might be vintage or alloyed. Some old items were made with lower-grade gold.
Check if it’s gold-plated. That still has value. You can wear it or sell it as costume jewelry. Just don’t treat it like solid gold.
Remove it from high-value listings. Update descriptions honestly. Mislabeling hurts reputation. Transparency builds trust.
Consider repurposing. Melt it down for crafts. Turn it into new designs. Learn from the experience. Every failure teaches something in how to test gold jewelry.
Is There a Way to Test Gold at Home Without Tools?
You can try basic checks. Use a strong magnet. Look for fading color on edges. Smell the metal—real gold has no odor. Fake metals may smell metallic or sour.
Observe how it feels. Gold is dense. It has a cold, smooth touch. Lightweight items may be fake.
Tap it lightly. Real gold makes a soft ringing sound. Base metals clink sharply. This isn’t foolproof. But it adds clues.
Still, home-only methods lack precision. Invest in a $20 electronic tester. It pays off fast. While you can how to test gold jewelry with nothing, tools bring clarity.
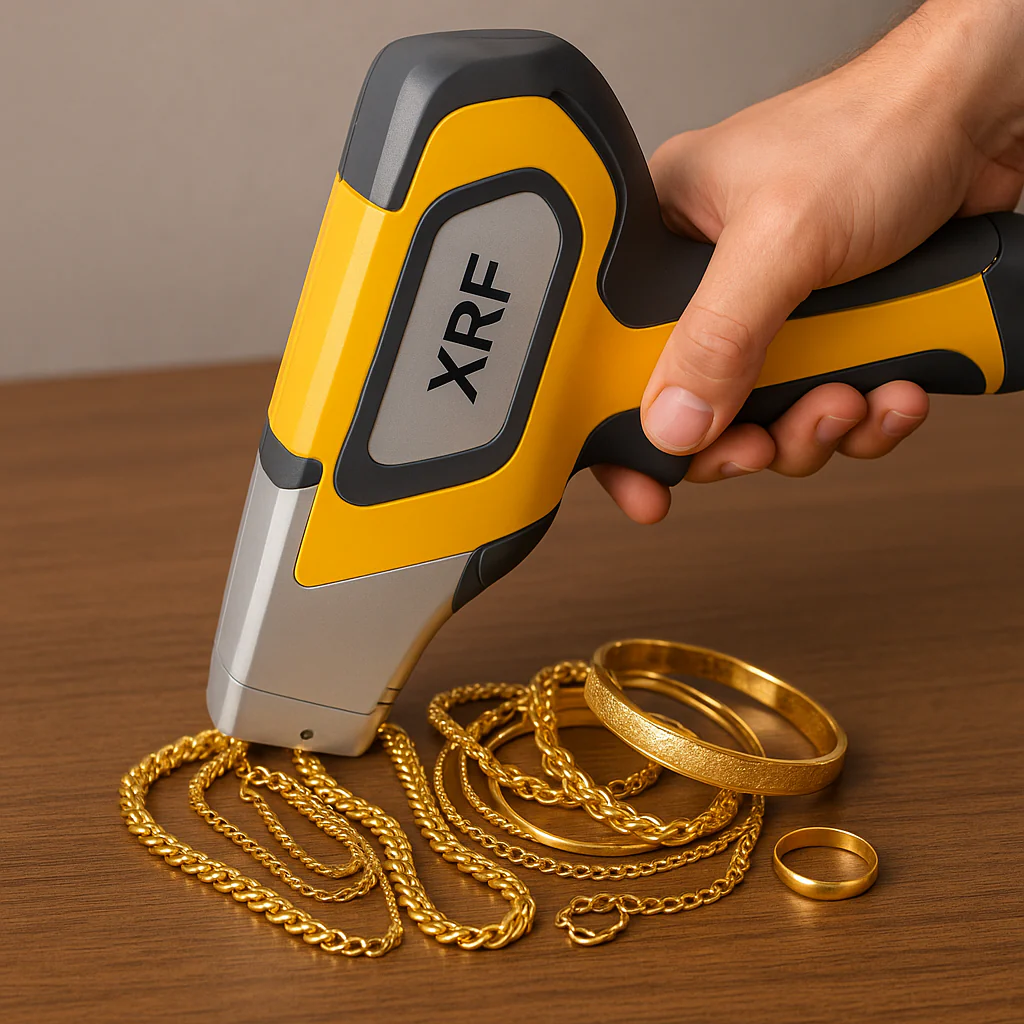
Should I Take My Jewelry to a Professional Instead?
Yes, for valuable or uncertain pieces. Licensed jewelers have advanced tools. They use XRF analyzers. These scan without damage. Results are instant and accurate.
Appraisals also help. Experts assess craftsmanship and market value. They issue certificates. This supports insurance or resale.
Professionals charge fees. But their accuracy saves money long-term. For family heirlooms or big purchases, expert review is wise.
Even if you know how to test gold jewelry, pros add certainty. Use both skills. Test at home first. Confirm with a jeweler later.
Final Thoughts
Learning how to test gold jewelry empowers every owner.
No single method is perfect. Use a mix of techniques. Start with visual checks. Add magnet and electronic tests. Confirm with acid or density when needed.
Practice on known items. Build skill over time. Keep tools handy. Stay updated on new methods. Knowledge grows stronger with use.
Whether you’re a hobbyist or serious collector, how to test gold jewelry is a vital skill. It turns guesswork into facts. It turns fear into confidence.
In the end, true value lies in knowing. With these tools, you’ll never wonder again. You’ll know exactly what you hold. And that makes all the difference.